I am not the Montessori teacher to come to when you are looking for a fantastic new work for the art shelf. Together with my co-teacher, Callie, we try to keep all the works on the art shelf process-oriented and open-ended, but we are always looking for creative new ideas and ways to fit these goals. One thing I do think we have figured out, our easel painting setup.

There are so many ways to set up painting at the easel, and I am sure this way is not revolutionary and, that many other classrooms do it just like this. But, in my class, this is the most independent and open-ended way that I have ever had easel painting.
Materials:
- Easel
- Three squeeze bottles filled with red, blue, and yellow paint (we have long since lost the little red caps, but we do keep a paper clip handy to poke through the dried paint in the tip!)
- Clips or clothespins to hold paper to the easel
- Small dishes
- Paint brushes in another cup
- Basin with soapy water and sponge
- Small bucket with water and sponge
- Drying cloth
- Apron
- Pencil
From left to right we have: the drying rack/paper source (not my favorite rack but I do like that artwork lays flat;, a small shelf that has the three squeeze bottles and three dishes on top and an apron on bottom; then the easel which has the basin of soapy water and the bucket underneath and the paintbrushes sitting in a cup on the ledge.

- The child first comes to the work and puts on the apron.
- The child gets the paper from the top of the drying rack and clips it to the easel.
- They fill the three cups with the paint or they mix the paint in the cups as they want. We use the words, “Just enough the cover the bottom of the dish” and hope for the best
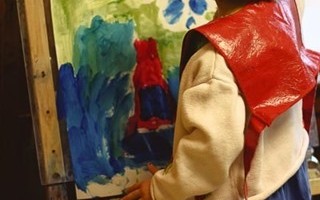
- The child paints
- They move the painting to drying rack. We show them how to remove the entire empty wire rack, lay the painting flat on the rack and then reinsert the wire rack. Often the young children need a little help getting the rack lined back up, but they are usually aided by an older child that is nearby
- The child then washes the paint cups and brushes in the basin with the soapy water, and dries them with a drying cloth
- Then the child wipes down the front of the easel with the bucket of water and the sponge
- Finally, they roll up the apron so it is ready for the next child.
At the beginning of the year we start with one color – red – for a whole month. The focus at this time is the process of setting up and cleaning up the work, and making sure that every child has received a lesson. Then in October, we add a second primary color, and by November we have all three primary colors out. During this time, in other areas of the classroom, we have works out that focus on mixing the primary colors to make the secondary colors, and we encourage and remind those painting at the easel that they can mix the colors in the dishes.

I am really enjoying this method of painting. It is completely independent – there is no more waiting for the teacher to come fill the cups; it is open ended – no one is telling them to keep the red brush with the red cup or not mix the colors. They have easel autonomy, freedom to do the work when they like, and the freedom to do it how they like, and really that is the basis of Montessori – freedom within limits.

There are drawbacks, cleanup never goes quite as well as you might like, the dishes and the brushes are not spotless, but usually the child has put in a good effort at cleaning. If the child has moved on and is engaged and concentrating on a new work, we typically will wipe out the dishes and give the brushes another rinse ourselves. If the child is still in the general area, I will invite them back to help me give everything one more wash. We also use the (table) scrubbing work to scrub the easel and the small shelf – all which get rather paint covered during the day.

We plan on adding another squeeze bottle soon, this time white. I am sure next year when we go to set the easel up, we will have new insights on how to improve this, but this year it has been such a pleasure watching the children truly explore color and painting at the easel.

As always, if you have any questions, or see anything in the pictures and you are wondering what it is (all I can see is a really dirty easel that needs to be hauled outside and scrubbed) leave a comment or send me an email.
Want to be the first to know what’s happening at montessori works? Sign-up to have posts delivered by email and never miss a thing!
[mc4wp_form]
I think this is the best way I have heard of to set up with the squeeze bottles and the little dishes. I’m going to use this method!
Thanks for sharing.
I am so glad it was helpful, it is really working well for us this year, hopefully that will always be the case!
Thanks for stopping by.
I had never thought of that–starting with one color. I’d like to give that a go! Thanks for the inspiration 🙂
This is great!! I was wondering if the child gets the basin with soapy water and the bucket with water ready each time or if the teacher does at the beginning of the day. Thanks for sharing Aimee!
This is great! Thank you. What easel do you recommend? I have 18month old twins. I’m also looking for a wooden table and chair set. Do you have any recommendations for which is best? Thanks!