*** please use caution when crafting with beeswax, especially with children. Wax is extremely hot, and can burn ***
These beautiful beeswax lanterns aren’t so much a Valentine’s Day craft, but the coming holiday, and our school’s craft sale, were the reasons Imogen and I decided to made another set of these.

We first experimented with this project before Christmas, she loved giving “her candles” to her grandparents and other family friends — they are a simple and stunning homemade gift.
What you need:
A supply of beeswax – I keep mine in a small crockpot. We have a few other annual beeswax crafts, so having a dedicated crock makes the entire process easier. I also like being able to remove the stoneware crock from the metal crockpot base. I have purchased a few local blocks of beeswax, then I supplement it with wax from my husband’s bees, and the left over nubs from beeswax candles that we have burnt. I need to replenish my supply and I think I will order these pastilles from Amazon if I can’t find anything locally.

Balloons filled with water – I had terrible luck with actual water balloons – they kept ripping while I was filling them – so we used thicker party balloons.
Aluminum foil or wax paper – to protect your baking tray and plate
Newspaper – to make cleanup a little easier

This craft did make me more nervous than dipping autumn leafs or making candles, and this time we did have our biggest beeswax accident ever. Imogen lost her grip on the balloon and it splashed into the wax, some did land on her and a lot went all over the counter. She was more surprised than hurt. Please do be careful and use your best judgment about how to modify this to fit your needs.
1. Turn your wax on to melt. I use it as soon as it is all melted, because I read this tutorial where one of her balloons exploded when she left her wax on too long.

<<wonky shaped balloon because I did not pre-inflate>>
2. Fill balloons with water. I found that the balloons had a better shape if I quickly inflated them with air before I filled them with water. Smaller balloons are better for children to dip, they are lighter. Also, try to let as much air OUT of the balloons before you tie them – this helps lessen the risk of the balloon exploding.

3. Once wax is completely melted you can begin the dipping process. I did the first two dips – it is very IMPORTANT that you do not go above the waterline in the balloon – that’s way I suggest letting as much air out of the balloon before you tie it off. If the hot wax reaches above the waterline, it will explode.

The above picture is from our December lantern making. Notice the obvious waterline, that’s why this time, I let out as much air as possible before I tied knots. Also see the oddly shaped and bulging lanterns. This was fixed by just blowing up the balloons about halfway before filling them with water. The clumpy wax on the orange balloon was because the wax had cooled too much.

4. After two dips place the balloon on a piece of aluminum foil and gently push down to make a flat bottom for the lantern.

5. Continue dipping – we did about 15 more dips. Hold the balloon securely, not just by the knot. Dip and then allow the wax to drip and harden for a few seconds, continue until you have reached about 15 dips. Imogen would say it was getting too heavy after about 8 – 10 dips (I think I over filled our balloons) so I would finish the last 5 or so dips. Alternatively, you and your child can also dip together, with you holding the balloon with them over their fingers. That allows them to feel like part of the process, but gives you more control and adds an extra layer of safety

6. Allow to cool and harden.


7. Pop water balloon. If you are feeling nervous about having your child dip the balloons, they can always just be the popper! That’s most of the fun right there!

8. I wanted to clean up the tops of these lanterns, so I heated a baking sheet lined with aluminum foil in a 200* oven. I then flipped the lanterns over on the sheet and gently pressed and twisted. It did neaten up the tops, but I’m not sure if I would do it again, I kind of like the unfinished edges.
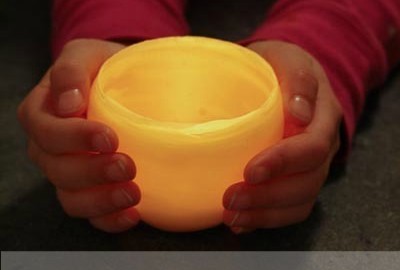
9. Add a tealight, or a battery operated tealight, and enjoy.

Give them to someone you love this Valentine’s Day. Help bring a little brightness and warmth in this cold dark month.
Never miss a post! Have all new montessori works posts delivered by email.
[mc4wp_form]
Ahhh I love these! They are so beautiful (I am candle-lover)! I think my daughter is “too young” as of now but I will keep it in mind for later!
One day! We did dip regular beeswax candles when she was three (with a very long wick).
These would make lovely gifts! My son is too young as well, but I think I would have just as nice of a time making them on my own 🙂
I really enjoyed making them. I want to try to add pressed flowers or leafs to them one day.
These are beautiful! I feel like this is a really silly question, but here it is anyway. Do they melt? Or do they just act as the candle holder and diffuse the light?
With a little tealight, we have had no melting. If you used a votive candle, it might produce more heat and melt, but I’m not sure!
I have been making these with my kids. Our lanterns almost always crack. How can we prevent this?